Tuesday 6 December 2016

Creative Expressions Tuesday

Christmas Wreath .

 Hi there everyone , today I am going to share a Christmas Wreath that I made using stamps from Creative Expressions. This is a project using alcohol inks onto heat resistant acetate and then stamping and embossing the designs onto the reverse side of the acetate .
The Wreath base is the MDF Star Wreath also from Creative Expressions which comes with various MDF stars . I only used some of the stars so there are plenty left for other projects .


On a sheet of heat resistant acetate stamp the baubles and emboss with gold powder . On plain white card stamp and emboss the same baubles and rub metallic gilding Polish onto the back of the baubles . I used Chocolate Bronze because I also used the same colour to colour the MDF ring which forms the base of the Wreath .

On the other side of the acetate dab various colours of alcohol inks to create random coloured baubles . Cut out the baubles on both the acetate and card .


Take five stars and apply texture paste through a stencil  to create some texture ( for swirls try using the mini stencil Splash . However any stencil wil work . It depends on your choice ) . When the paste is dry paint the stars with Cosmic Shimmer black Gesso .


Once the Gesso is dry rub your choice of Gilding waxes over the raised design on the stars .
To give the baubles some shape and dimensions stick the acetate onto the white card using dimensional glue . The white card behind the acetate allows the colours on the acetate to show up clearly .


Take some cinnamon sticks and ribbon and tie the sticks into little bundles . Take a few pine cones and paint them with gilding Polish  to make them shiny . Once all the pieces are ready sick them onto the wreath using dimensional glue . Use more ribbonto create a loop to hang the wreath and also to allow one of the stars to hang from the bottom of the wreath .


Here is a closer view of the base of the wreath .


The combination of the gold embossing powder , shiny acetate and Gilding Polishes creates a nice festive project . I hope this has given you some inspiration for making seasonal projects for home decor .
Creative Expressions items used in this project include :--
Stamps to Die For -- Mini Ornate and Beaded Bauble , Mini Christmas Scene andLeafy Bauble .
MDF Star Wreath .
Gilding Polishes - Chocolate Bronze and various others .
Cosmic Shimmer Black Gesso .
Texture Paste .

If you would like to see what other members of the DT are doing please look at Creative Expressions


Monday 7 November 2016

Creative Expressions Tuesday

Hi there , today I have a Christmassy project to share with you . I know , it's not Christmas yet but it's fun to start making bits and pieces to decorate the house . So I thought I would start with a pretty
Christmas Snow Globe. .


First I painted everything ( Snow Globe , Reindeer , trees and snowflake ) with white  gesso. You will probably need two coats .

Sprinkle Pixie Powders over the back of the Globe . Pixie Powders don't react quite the same way on paint as on paper , I think the water is not absorbed into the paint as fast . However that means you can get a lovely background effect on paint . I sprayed lots of water onto the globe and added more powder .
You can see the Powders spreading in the water . By wobbling the globe a little the colours can be encouraged to spread and mix . If there are any little bits that don't mix you can ' help ' them with a small paintbrush.


I did dry this with a heat gun but keep it further away from the globe than usual because the water is blown around if the airflow gets too near .

Once dry the shimmer is lovely . Colours used - Midnight Sky , Midnight Blue and Emerald Green .


I coloured the trees and Reindeer in the same way . Colours used - Emerald Green and Golden Mint for the trees and Bronze Blush with White Pearl for the reindeer.

When I put the globe together I decided that the colours on the reindeer were too pale and I coloured them with Graphite Gilding Polish to make them stand out . I thought you would like to see the original colour in case you prefer it .


I stamped the spots from Inky Christmas onto the trees and embossed with Snowcap powder.


I stamped the foliage from Inky Christmas around the edges of the Snow glob frame and embossed with a mixture of Blue Zircon  and White Fire  powder . The two colours mix beautifully to create a paler blue that tones well with the background.


I then stamped the stars from Midnight Waltz onto the background and used Snowcap  embossing  powder .


Finally I stuck all the pieces together to create the winter scene.
I rubbed Graphite Gilding Polish around the edges of the globe and over the snowflake. I then stamped the largest bauble from Inky Christmas onto the snowflake and used Snowcap  powder again .
I think the Pixie Powders really add a lovely shimmery effect and by using gilding polish and glitter embossing Powders the whole project looks really sparkley and festive .

Creative Expressions items used for this project:
MDF--- Snow Globe, Reindeer Accessory pack , Tree Accesory pack , Snowflake Accessory pack .
Stamps --- Inky Christmas and Midnight Waltz.
Pixie Powders ---  Golden Mint, Emerald Green, Midnight Blue and Midnight Sky .
Embossing Powders--- Brilliant Sparkle , Snowcap, White Gold and Blue Zircon.
Gilding Polish---Graphite.
White Gesso .

If you would like to see what other members of the DT have been doing go to Creative Expressions

Monday 31 October 2016

Creative Expressions Monday

Hi there , I'm back a day early because today is Halloween and I would like to share a Halloween project with you !  This is a Village made from a DCWV kit which you may have seen on Lisa Horton's blog or on Hochanda TV . Lisa had decorated hers with Christmas in mind and I love what she did . So instead of more Christmas I thought I would decorate the village for Halloween.
I found it much easier to paint the village while it was still in its sheets of card and pop the pieces out afterwards . I painted the houses in shades of grey made by mixing black and white Gesso together . The rooftops were painted black as were the tree and the water tower .


After painting everything I decorated the bridge and houses with stamps and Embossing powder . I will just write the stamps I used and the colour of the powder by each picture .


Tall House ---: Down sides of house from Artsy Background in purple and splat in black .Vines and bird from Rustic Birds in black .


 Large House---: Dots in blue and vines and birds in black from Rustic Birds . Two of the birds have been stamped and embossed on card and then cut out . They were then attached to the house with dimensional glue . The copper arches are the pieces popped out of the windows and coloured with Gilding Polish .


Dark House---: Foliage in black from Inky Christmas. Splats in purple from Artsy Background. I also added another cut out bird .


Small House ---: Dots in blue and vines in black (and blue on the root ) and bird  from Rustic Birds.


Bridge ---: To create the effect of black oozing down the bridge I randomly applied perfect medium and embossed in black .

I then added a few extra props from my stash to make the scene more spooky---:
Pumpkins painted black and then rubbed with various Gilding Polishes .
Mushrooms painted and then stamped and embossed with dots from Inky Christmas.
Spiders painted with Graphite Gilding Polish and then rubbed with other colours of Gilding Polish .
Tree wrapped with artificial spiders web .
I then added some small lights to illuminate the village.


So here is the finished village in normal light.


And here are two pictures of it lit up and looking spooky!


Mmmwwahaha !
I hope that you have enjoyed my little bit of Halloween fun and maybe it has inspired you to create your own village .

Creative Expressions items that I used include :
DCWV Village.
Stamps by Lisa Horton - Rustic Birds, Inky Christmas and Artsy Background.
Cosmic Shimmer Embossing Powders - Detail Black, Viola Lavender Blaze ( purple ) and Navy Viola Blaze ( blue ) .
Gilding Polishes- Pistachio, Dark Cherry, Red Bronze , Golden Olive Apricot and Chocolate Bronze .
Cosmic Shimmer Gesso , black and white .

If you would like to see what other members of the DT are doing please go to Creative Expressions

Tuesday 27 September 2016

Creative Expressions Tuesday


Ornate Frames .

Creative Expressions have a set of two MDF ornate frames which I have decorated for this post .


I decided to keep the colours limited and use metallic colours to add to the project.
Creative Expressions items that I used for this project:--
MDF Ornate Oval Frames.
Creative Expressions Stamps by John Lockwood, Christmas Rose Elements ,
Just Rite Background Stamps , Blooming Vines and Floral Flourishes .
Spell binders die , Botanical Swirls.
Cosmic Shimmer Metallic Gilding Polish , Chocolate Bronze, Gold Treasure and pearl Lustre .
Cosmic Shimmer embossing powders , Copper and Gold
Creative Expressions gesso , white and black .
Creative Expressions Finishing Touches , Pearl Stick Pins .

You will also need some dried poppy seed heads little glass bottles and pearls .

 Paint the frame and back of the insert with black gesso . Paint the front of the insert with white gesso. I prefer to paint two thin coats and sand the surface between coats to create a smooth surface for stamping onto . Stamp the Blooming Vines onto the insert with Wateringcan Ranger Archival ink .


Using black card die cut the swirls . Rub all three of the gilding polishes over the die cut colouring it randomly . Cut the swirls to fit the insert . I find it easier to cut slightly larger , stick the card down
and then trim to fit .


Once this is attached the frame can be adhered to the insert .


Next stamp and emboss  the Christmas Roses onto white card with copper powder and cut them out . Notice that I used the corner stamp with three flowers on it and cut off the holly leaves leaving a pretty set of flowers . These can then be curled and stuck onto each other to make dimensional flowers .


Stick pearls to the poppyseed head and then paint them black . Once dry they can be rubbed with the metallic polishes .
Put the tiny bottles on the end of a paintbrush and paint them black . Heat set with a heat gun . It may require two coats . To stamp and emboss on the bottles , use Perfect Medium on the Floral Flourishes stamp and roll the bottle over the stamp . Then pour gold embossing powder onto the bottle and heat as usual.

Finally attach the bottles to the frame , put the seed heads into the bottles and attach them to the frame to keep them stable . Attach the flowers in place and add some pearl stick pins .

Here is the final piece . I like using poppyseed heads because of their architectural shape and once dry they are very tough !

These frames would be lovely for all sorts of projects , so let your imagination lead you .

If you would like to see what other members of the Creative Expressions DT are doing please go to 


Saturday 24 September 2016

PaperArtsy


Bewitching Autumn .


Today I want to share this project which is inspired by the colours of Autumn. I coloured the background with PaperArtsy paints spread over the plaque with a credit card .


 I then stencilled these leaves using a PaperArtsy stencil and added some stamped grasses using paint .


This centre piece is painted corrugated cardboard . I then added crackle glaze and painted over it with    a paler paint . The leaves and words were stamped onto the card and then washes of colour applied to the card . The glimmer is from Treasure Gold .


I stamped leaves onto coloured papers and flowers onto yellow paper and cut them all out so that they could be added to the plaque. The artificial berries were painted to tone with the colour palette and also adhered to the plaque.


Finally the quote was printed onto canvas photocopy paper and coloured with washes of colour before mounting it on black card .


Here are two close ups of the plaque .


All the stamps used are from PaperArtsy, ELB29 and ELB30 . Also EEB08 .


This project is on the PaperArtsy blog where there is more detailed directions . If you would like to see it or see what other members of the PaperArtsy DT have been doing please go to 


Tuesday 20 September 2016

Creative Expressions Tuesday


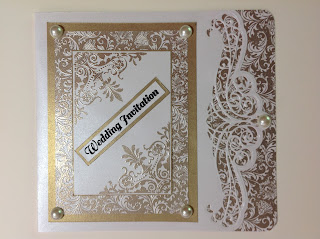
Some Inspirations for Wedding Stationery.

I have been making Save the Date cards recently for my daughters upcoming wedding . Of course I will soon be making the invitations and any other necessary stationary  ! This is  a lovely thing to do for any Wedding because the invitations will be completely individual  and personal.
So I thought I would give you an idea and hope to inspire you to make something different for a special event .
To create these cards I used the following items from Creative Expressions :-
Creative Expressions dies by Sue Wilson , Gemini Dies , Pavo.
Creative Expressions Stamps , Singles , Wedding Collection .
Just Rite Stamps ,Floral Flourishes Background Stamp and Ornate Corners .
Foundation Pearl Card. , Antique Gold and Icicle .
Embossing Powders , Gold and Black .

I started by die cutting the White card . This die is slightly narrower than the width of A4 card so the card will have to be trimmed .


Next I stamped and embossed with gold powder onto more white card  . I repeated the pattern to cover enough card to go under the die cut  .  This was adhered under the die cut piece and trimmed to size . I used a corner cutter to round the edges .


I stamped and embossed a second , smaller piece of card and trimmed it to size before mounting onto gold card .


I then stamped and embossed corners from the Ornate Corners stamp set and again mounted this onto gold card .


Finally I stamped and embossed in black the words and mounted this onto black card to make it stand out . All these pieces were attached to the card as shown and some flat backed pearls were added . Once finished an insert with any relevant information can be made and added to the card .


Here I have made a Save the date card in a similar way . The card is narrower and shorter than the main invitation . The die cut piece has been trimmed to fit but still looks lovely and this ensures that the different cards wil all match with each other 
Clearl the base of the card is the same as the main card . However I have used slightly different colours to make this card to show a variation that is possible 


I have used gold card to stamp on and black embossing powder . As the Save the Date card is smaller I have kept it simpler in this variation . 


Other variations could involve using gold card under the die cut white card and not stamping on it . Or why not use completely different colours ?
Anyway that's all for now , I'll be back soon . I hope this has given you some ideas .
If you want to see what other members of the Creative Expressions DT are doing please go to 

Creative Expressions Tuesday


Painted Bag


Today I am going to show you how I decorated a plain canvas bag using Creative Expressions Lustre Fabric Paints . These are lovely thick paints which dry with a great sparkle but I found that even when diluted with water they still sparkle . I also found that they dry a little paler than when wet .
I decorated both sides of the bag and put a piece of card with cling film covering it inside the bag to protect the side that was not being worked on .


Dampen the fabric with water . Each colour was thinned with water before applying randomly to the bag . I started with Antique Copper .


I then continued adding colours randomly . I used Royal Purple, Sea Green and Golden Lime . As the colours are applied they can be blended together where they meet . Dry thoroughly.


I then applied paint through stencils . These were all That Special Touch 6 X 6 masks --- Small Polka Dot , Peacock Mask and All Stirred Up .
I started with the polka dots and a mix of Atlantic Blue and Graphit Noir , creating dots randomly on 
the bag . Next I mixed Golden Lime , Sea Green and Atlantic Blue to make a brighter blue/green and 
stencilled the peacock feathers onto the bag extending the design up the bag .


Finally, using Pearl Lustre I added the swirls from all stirred up .


I then used stamps from the Creative Expressions Clear stamp sets -  Summer Meadow for the vine effect and the flowers from Wild Flowers . I used Graphite Noir paint to stamp with ( apply with cut and dry foam and wash the stamp as soon as you have finished ) . These paints stamp well and the image is clear , I created a vine- like effect by repeat stamping as shown .


Using the flower I added to the vines . The stem of the stamp can be bent gently in different directions to creat variety.  Leave some spaces for the butterflies!


Here you can see how I have coloured the handles and extended the stencilling onto the handles .


Finally stamp butterflies from the Butterfly Splash set . This shows the finished bag from one side and the next picture shows the other side 


Here is part of the bag with a tag made to match tied on with twine .


The tag is made from greyboard cut to size and painted with white gesso. I then decorated some fabric in the same way as the bag and adhered it to the tag . The flower is made from more painted fabric rolled and twisted. Add other decoration as needed to finish the tag .

As you can see these paints are lovely and can be used in different ways . Combined with the amazing silhouette stamps the results are clear . I hope this will give you some inspiration  about decorating fabric .

Items from Creative Expressions used to decorate this bag include :--
Lustre Fabric Paints ---  French Pearl, Graphite Noir ! Atlantic Blue , Golden Lime , Royal Purple , Antique Copper and Sea Green .
Creative Expressions Clear Stamp Sets --- Wildflowers , Summer Meadow and Butterfly Splash.
That Special Touch Masks --- Small Polka Dots , Peacock Mask and All Stirred Up.

If you want to see what other members of the DT team are doing please go to