Sunday, 27 August 2017

Creative Expressions


My Minds Eye


Here I am again with my Creative Expressions project . This is based on a driftwood circle which I painted with a base coat of white Gesso before decorating it . I like starting with Gesso because I can then sand it to creat a nice smooth surface.
I am going to list what I used first:-
Chalk Cloud Blending inks-- Enchanted Blossom, Sweet Violet ,  Misty Grey and Blue Lagoon .
Colour Cloud Blending Ink - Chic Aubergine.
Acrylic Paint - Cocoa Praline and Twilight Purple.
Cosmic Shimmer Acrylic Gesso- White .
Woodware Stamps - Eyes .
Clear Stamps - Silhouette Garden.
Clear Texture Paste.
That Special Touch Masks - Tracery ,Ornate Elements
Dies by Sue Wilson- Perfect Peony Complete Petals , Olive Branch and Dandelion Posies .
Archival Ink - Watering Can .
Gilding Polish - Pearl Lustre and Chocolate Bronze.

After the Gesso was dry and smooth l rubbed the Chalk Cloud  Blending inks across the driftwood circle randomly . I used all the colours except blue lagoon.. I then stencilled through the Tracery mask using the grey ink . Just a few places .
I mixed  the two acrylic paints to create a deep purple colour which I added to texture Paste . I applied this mixture through the ornate elements mask as shown . Finally I stamped in between the raised areas using a stamp from the Silhouette Garden set using watering can ink .


I used one of the smaller hexagons from the set and coloured it with Blue lagoon and sweet violet ink . Because I didn't use gesso first the colours are darker . I used the ornate elements mask again with Chic Aubergine to get a deeper background.
I then stamped one of the eyes from the Eyes set . I used a white pen to add highlights to the eye and to write the words . I realised that the background was too purple when the hexagon was finished so I rubbed lots of blue lagoon around the edges of the circle to pull all the colours together.
The raised stencilling was rubbed with both the gilding polishes before attaching the hexagon.


The flowers and leaves  and dandelions  are cut from black card and then attached to the circle .
That's all for now folks !!! Back soon .
If you want to see work by other members of the DT team please go to


Sunday, 13 August 2017

Creative Expressions Blog


Pretty Paint Palette.

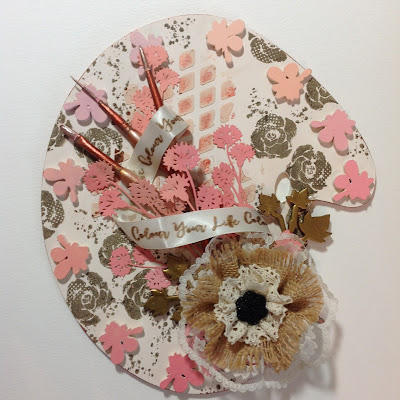
Today I am going to share my latest project for Creative Expressions , a decorated MDF paint palette. I've used a limited palette of colours because I think it would be very easy to use lots of colours, after all that's what a palette is for , and I wanted to see what would happen if I limited my choice of colours . Here's the result .
I base coated the palette with a a mix of Flushed Cheeks and Perfect White to create a warm but fairly neutral base colour . I mixed this colour with clear texture paste and used this through  the Chicken Wire mask . When this was dry I rubbed copper Gilding Polish over the raised areas .
The ' paint blobs ' come with the palette and are also MDF . I used the above paint colours and also Samba Pink and Red Apple to mix lots of different shades of pink to colour the blobs . If you put a little of the Flushed Cheeks into all the mixes all the colours will tone together . ( this is an old painters technique to create a harmonious group of colours ) . Paint any excess paint onto a piece of white card . When this is dry it can be die cut using Dandelion Posies  . The blobs can either be attached now or after stamping the roses .
The roses and dots are from Silhouette Garden and were stamped using Archival Potting Shed ink. 


To create the other embellishments  I took three old paintbrushes and used cosmic Shimmer glue to hold the bristles together  . I painted them with any colour from my palette and then rubbed the copper Gilding Polish over the brushes . I added some of the gold Treasure Polish here and there .
I also used this colour onto some MDF Flourishes. Finally I stamped the words from Creative Art in potting shed ink onto some ribbon . 


The rosette is made using lace and a strip of hessian and a CE button in the centre . All the embellishments were attached as shown  to complete the palette.


Here's the finished project which I hope might inspire you to try a limited colour palette.
Items I used to make this :-
MDF Paint Palette and Flourish Accessory Pack .
Cosmic Shimmer Acrylic Paint - Flushed Cheeks, Perfect White , Samba Pink and Red Apple .
Stamp sets -- Silhouette Garden and Creative Art .
Dies by Sue Wilson, Finishing Touches - Dandelion Posies .
Cosmic Shimmer Gilding Polish - Copper Shine and Gold Treasure.
That Special Touch Mask - Chicken Wire.

If you want to see what other members of the DT are doing please go to