Monday 5 November 2018

Creative Expressions

Happy Belated Halloween.

I'm sorry that this is late but I had some technical difficulties getting my pictures onto my blog . When I realised what I was doing wrong ... well now I can't show you this Halloween project . 
This is intended to be a fun piece of inspiration and as a such I won't explain every step but share some ideas .

I'm going to list the Creative Expressions products I used to creat this here ( so that it's clear what I used ) :-
Woodware Stamps, Toadstool Clump , Toadstool Ring and Old Letter .
Cosmic Shimmer Black and White Gesso.
Cosmic Shimmer Acrylic Mixed Media Paint, Red Apple, Sweet Satsuma and Orange Popsicle .
Cosmic Shimmer Metallic Gilding Polish, Silver Hessian, Apricot and Chocolate Bronze.
Cosmic Shimmer Iridescent Shimmering Watercolour Paints , Set6 , Antique Shades .
Distress Inks , Old Paper and Gathered Twigs .
Distress Oxides , varied including Peacock Feathers, Fossilised Amber , Spiced Marmalade, Seedless Preserves and Vintage Photo .

I made the hat over black card and the shelf unit out of mount board . The base was rescued from a skip ( I did ask politely if I 
could have it ! ) I covered all three with crumpled black tissue paper by coating the area with matte medium and attaching the tissue by spreading another coat of medium over the tissue. When dry I painted black gesso over everything. Finally I rubbed the Gilding Polish over the tissue paper catching the raised areas .


I stamped and embossed in gold The Toadstools onto black tissue paper and applied it to to the hat to create a design all around the 
hat . I originally painted the toadslools before applying them with Matt Medium but discovered that this lifted the paint off the paper . So I advise painting them once attached to the hat !


Here's a picture of the way I made the little books . I stuck pieces of mount board onto fabric and then stuck down the edges . Once dry the covers were coloured with Distress Oxides in exactly the same 
way as colouring paper . In fact I also coloured some paper at the same time to used for various items . Cut a small piece of this paper to line the cover . Then cut several pieces of paper that will be the 
pages of the book . The best way to do this is to cut them so that they can be folded in half to make two pages . If the book is to be 
open cut a double page for the centre of the book . I stamped the writing from Old Letter onto this center page . I found that for such 
a small item I needed to stamp twice , the second time between the first lines of script to create script close enough together. Also I used Old Paper distress ink to colour the other pages !


The scrolls were also made with paper coloured with Distress Oxides and cut into strips . I was lucky because I found some mini 
rolling pins which I used as the ends of the scrolls . To colour the wood I dabbed some Distress Oxide onto the palette and mixed it with a little Matt Medium to make a glaze.


All the plastic bits and pieces ( skeleton, skull, spider etc ) and the 
bottles were painted with black Gesso . When dry I dry brushed white Gesso over all of these to highlight the bones etc . I thought the white was too bright so I mixed some Gathered Twigs  with Matt Medium to tone the colour down .
The Pumpkins were painted with the various paints .


I really hope you enjoyed this bit of Halloween fun and that maybe it inspired you to create something as well ,
Bye until next time ! 

Wednesday 8 August 2018

Creative Expressions

Pretty Wall Hanging .

Hello there and welcome to my blog . I thought I'd share a wallhanging that I created using Creative Expressions stamps and products .
The three parts of the hanging were made from canvas board painted with white Gesso . I punched holes in the Boards before decorating them so that I could add the rings later .


I added Texture to the boards using texture Paste through stencils in random places .
Once dry I added another layer of gesso. The background colours were added using various Distress Oxides randomly over the boards . I added some extra patterns through stencils and then stamped the leaves from the stamp set Portraits ( I used Archival ink Wateringcan which is more subtle than black ink ) .


Finally I rubbed small amounts of Gilding Polish over the raised areas . I mixed Gold Treasure with Pearl Lustre to create a pale gold and added touches of Purple Paradise and Fern here and there l

All the flowers are from the stamp set Waterlily . Although these are waterlilies they can be used other than on water ! I cut out lots of flowers after I had coloured them with watercolours . 


The frame here and on the lowest board and the clock in the centre are all Pop Ems which have been coloured with the same Gilding Polishes . I also added a piece from my stash which I coloured with the same Polishes .
The face in the frame was stamped from Portraits.


On the base frame I've stamped some words from Watch the Birdie stamp set .
The paper flowers were painted using Purple Paradise Gilding polish thinned with a little water .
Once all the pieces were finished they were attached to the boards . The flowers were attached using dimensional glue to give them some shape .
The bow on the top is raffia and twine and the Stick Pins were added as shown .


I've tried to show how it's possible to use these flower stamps in a different way to create a lovely hanging. I hope it inspires you to try something different.

Creative Expressions products used for this project include:--
Creative Expressions Stamp Sets , Waterlily , Portraits and Watch the Birdie .
Creative Expressions Mini Stencils , Shabby Harlequin and Splash.
That Special Touch Masks , Trellis and Peacock.
Cosmic Shimmer Gilding polish , Gold Treasure, Pearl Lustre, Purple Paradise and Fern .
Creative Expressions Pop Ems  , Ornate Frames and Pendulum.
Creative Expressions Pearl Topped Stick Pins , cream .

If you would like to see what other members of the CE Design team are doing please go to 


Wednesday 18 July 2018

PaperArtsy


PaperArtsy new Stamp Release .

Hi there , I'm here this evening to share some projects that I have made using two new sets of stamps that I have designed. The lovely people at PaperArtsy have made these stamp sets and the official release can be seen on their blog tonight .
These designs are inspired by the shapes and flowers found in decorative and traditional painting. One of my loves is Decorative Painting which I have studied for years . It fascinates me that there are many forms of painting around the world which seem to use the same shapes within the designs . However, despite this , the forms of painting are instantly recognisable as coming from particular places . For example the English form of traditional painting is well known as canal boat painting -- Roses and Castles .
Other forms of art work also use the same shapes for example Jacobean embroidery .
So I have hand drawn these stamp designs with these ideas in my mind and I hope you will enjoy them .
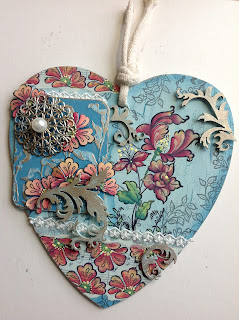
Heart Wall Hanging .

Firstly I should say that not only has PaperArtsy released new stamps but they have also released some new paint colours .
I've used the new colours for all of these projects , namely , Lemon Meringue, Mustard Pickle, Vintage Lace , Blah Mange , Mulled Wine , Peach Nectar , Seaglass , pine Grove , Surfs Up and Twilight . I've incorporated these colours in the projects to show how well they work together .


The heart was based with Surfs up and then I stuck some old music paper over it and washed the same colour over the paper . I added Surfs Up in random patches and then some Crackle Glaze .


I painted over the Crackle Glaze with more Seaglass . I added the main design and coloured it with some of the new colours .


The stamping around the edges was done with a grey ink .


Here I've stamped and painted some of the single flowers before cutting them out . I've also created a plaque from cardboard which I pushed Grunge Paste onto through a stencil .  This was painted wirh Surfs Up and then I added some Treasure Gold onto the raised areas .


I've created some floral paper by stamping and painting on old music paper. Once I'd made all the pieces I attached them to the heart as shown .


The next two photos are close ups of the finished plaque .


Floral Card .

I've reversed the colour scheme here so I could use the lovely shades of blue on the flowers .


I painted the background of the card and the piece of card on top with Vintage Lace  . The base card has been coloured with the yellow and red colours , the purple areas are where I've added Twilight over the red . Lots of random stamping finished the background.


I've washed some of the colours around the edges of this after colouring the stamped design. I added a little lace before sticking the two parts together.


Black and Gold

This card was inspired by a form of Decorative Painting called Khokhloma.
It's deceptively simple , paint the background Gold and stamp the design with black ink  .
Fill in all the areas  around the design with black paint .


I've finished the design by adding bits of Mulled Wine and some stamped and embossed areas .


Floral Frame .

This is only a small frame but it shows off the flowers beautifully .


I used Grunge Paste through a stencil on both the frame and the base and painted everything with Vintage Lace before rubbing White Fire Treasure Gold over the raised areas . I then stamped little leaves from the stamp set onto the frame . 


I stencilled a script pattern onto the base and then stamped the design.


I then stamped , painted and cut out the flowers so I could create a three dimensional flower on the base . As the design has little commas on the petals I painted them in a very pale colour .


Tag Card .
This is really three pieces in one ! A card with a pocket on it and two tags .


The background has been painted wirh Vintage Lace and has some other colours blened over it . I've stencilled over this with some blues and stamped some simple designs.


Here's the two tags with different coloured backgrounds and stencilling. I've added different flowers and coloured them with the paints . In each case I've built up washes of colour starting with Mustard Pickle then Peach Nectar and finally Mulled Wine to create a rich blend .


I created a small pocket and stamped and painted it so that I could tuck the two tags in it ,

I haven't even shown the fact that some of the sprig designs can be used as stems for the individual flowers, which I hope to show on this blog as soon as possible.
In the meantime if you would like to see all the other wonderful designers who have work on the PaperArtsy blog please go to 

Creative Expressions


Hello there and many apologies for the long gap . Unfortunately there has been a lot of illness within my family which has interfered with my work . Anyway things are slowly getting back to normal and I will be back with more goodies ! 
Today I am sharing three cards I made using my new stamps from Creative Expressions and lots of colours from the new Shimmer Shakers range . 


So , I had a little fun shaking all sorts of different colours onto card and spritzing with water to get the colours to spread and mix . The colours are lovely with lots of shimmer! Here's a collection of the  coloured card  I made !


I then used the card in different ways to create some cards . The background of this card was made from strips of coloured card  stamped randomly with flowers . The butterflies were stamped on scraps of the same card  so they were already coloured !
The important thing I found out about these powders is that they can be used as paints . Put a little of your chosen colour on a palette and add a little water and you have a shimmery watercolour. This means the painted flowers are in colours that go with the background.


On the background for this card I only used a little of the powders to create a soft colour . Then I stamped the design. I used Dusty Mink to paint the flowers and to keep the colour scheme simple .
Although it doesn't show well in the photo the painted areas really shimmer.


I did something different for this card , I stamped the design across two pieces of card so that I could have a raised area . I then stamped the same deign several times onto card that I had coloured all over with the Shimmer Shakers. I cut out the flowers so that I could create a dimensional effect on a simple black and white background .

Creative Expressions products used include :- 
Lots of different Shimmer Shakers.
Creative Expressions Clear Stamp Set-- Anemone, Hypericum and Mixed Posy .

I've used lots of different colours here just to show the wide range available and I hope I have inspired you to try them out .
If you want to see what other members of the Creative Expressions DT are doing please go to
Creative Expressions

Tuesday 1 May 2018

PaperArtsy

Pretty box using Kay Carley Stamps .

Here are some pictures to inspire you . I've decorated this box as part of the topic 'Boxes ' on the PaperArtsy blog . As I've written on that blog how I created this I'm not going to do it here .


I just thought I'd you some more pictures of the finished project .


All the colouring has been done with PaperArtsy Infusions . I put a little of the powder on a palette and mixed with water . They layer over each other beautifully.


Here's a closer picture of the top of the box .


There's a secret surprise inside the box that I will share with you another day .
If you would like to see this or what other members of the PaperArtsy team have been doing go to

Wednesday 25 April 2018

Creative Expressions

A Little bit Steampunk!


Hi there , I'm here today with another project for Creative Expressions, this time it's Steampunk. I'm sad to say that I can't write this up with long explanations about how I made it so I thought I'd show you lots of pictures to inspire you .
This is created using a large shadow box, which I've decorated with lots of bits and pieces from Creative Expressions and my own stash of goodies .


When I create a shadow box I always think of it in terms of - back , middle and front. .


So I paint all the surfaces and add decorations to the back of the boxes , in this case stamped and embossed.


Then I work on filling the spaces . All the little bit of 'furniture ' are made out of mount board and painted .


The sparkly effect on the clock is created using a new product from CE called Granite Paste and the clock and pocket watch are some of the new POP EMS .


Even the flowers are decorated by making a paint out of Gilding Polish and painting them .


The little bottles are painted with gesso and the image stamped on black tissue paper and embossed with gold powder . The tissue can then be attached to the bottles with Matt medium .

I hôpe this has given you some ideas .
If you want to see what other members of the CE design team are doing go to