Tuesday, 28 June 2016

Creative Expressions Tuesday


Framed Roses

Hi there , I'm here today to give you a look at my most recent project for Creative Expressions, using stamps and dies . I've used a wooden frame that I found in my stash , which sadly had lost its insert . So I cut a new insert out of heavy greyboard and then painted the frame with white gesso.


Once The gesso was dry I sanded the frame to create a smooth surface and also to remove enough gesso to make the frame look distressed. I added a coat of matte medium to seal the exposed wood ( otherwise the unsealed wood would have 'grabbed ' the next layer of colour ) .


I used pigment inks to colour the frame by rubbing the inks randomly over the whole frame ( I always  include the back of the frame when I decorate so that the whole project is finished) . I used Adirondack pigment inks -- Eggplant, Juniper, Mushroom and Sailboat Blue .


I used Mushroom ink to stamp the script , from the Textures stamp set , randomly here and there onto the frame . I then used StazOn Slate Grey ink to add random touches from the Floral Flourishes stamp to the frame .


I covered the insert with paper from the English Garden pad and added colour using the same pigment inks .


To make the flowers I cut paper from the same pad using some floral dies . I filled the centers of the flowers with a mixture or seed beads .


The centre of the frame was filled with various designs from the Rose Bouquet stamp set which I stamped and cut out . I painted the designs with watercolours and then mounted the quote and the main element onto gold mirror card . 


Finally I assembled the project . The hanging beads are from a scrap of trimming that I originally found at a haberdashery shop , and I stuck this down first before covering the ribbon with lace. I then attached the roses and leaves that I had cut out from a larger stamped image . The central image was attached with several layers of foam pads so that it sat above the beads . 
I attached lots (!) of the paper flowers around the frame and added some stick pins. The quote was 
attached using foam pads .


I started this project using the lovely paper pad as inspiration. The colours of this pad are subtle and this allows them to be used with lots of other colours .

To make this project I used the following Creative Expressions items :---
Stamps --- Creative Expressions, Textures .
Just Rite Stamps , Rose Bouquets Vintage  Labels .
Just Rite Stamps , Floral Flourishes Background Stamp .
Dies by Sue Wilson --- Orange Blossom Complete Petals .
Perfect Peony Complete Petals.
Craft Consortium Paper Pad --- English Garden Premium Collection.
Finishing Touches--- Pearl topped three inch Stick Pins , cream .

If you would like to see what other members of the DT are doing please go to 


Tuesday, 21 June 2016

Creative Expressions Tuesday

Pretty Card


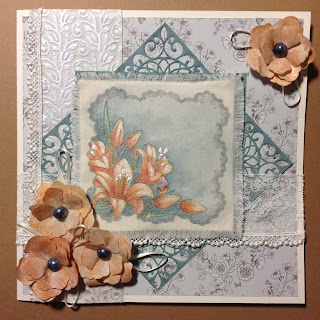
The card I am sharing with you today is unashamedly pretty . I have been working with fabric and stamps recently and so I decided to make this card using fabric as part of the design. The main design  and flowers are made of fabric and the embossed stripe is also fabric.


The Lily Corner was stamped onto a square of fabric with Wateringcan archival ink before fraying the edges . I find that when stamping flowers I often prefer to use a dark ink but not a black ink. I find that black is often too dark and overwhelms the flowers so I tend to use it only when there is black elsewhere in the design .


Before colouring the design I painted the back of the fabric with matte medium . This makes the fabric a little stiffer . I avoided painting the frayed edges so they continued to be soft. . I used various shades of Lustre Fabric Paint to colour the design but I thinned to paint with matte medium because I didn't want to cover the stamped image and these paints are very thick . Even using the paint thinned in this way the pigment is strong and the shimmer remains . The stamens were painted with unthinned paint and I made a thick blob which stayed in place as it dried . The background was painted with paint thinned as before but I added a little water to the fabric to help to blend out the colour . When the paint was dry I attached the fabric to a square of cream card to support it .


I found a piece of card that toned with the background colour of the painted design and cut a square 
larger than the fabric. I then use Meridian Edger die to cut the corners as shown. Finally I cut another 
square of the same card to fit under the square formed by the die cutting and stuck it under the die cut  square so that the corners completed the uncut square. I did this so that it would sit under the fabric and make a background for it .


This shows a strip of embossed fabric. To make the fabric hold the embossed design I painted it with matte medium which made it stiffer  before embossing it. I then rubbed grey blue gilding wax over the raised surface just like I would when using paper .


The flowers were also made from fabric which was painted with matte medium and then die cut using the Perfect Peony dies . I coloured the individual pieces with washes of paint from the colours I had used for the main design and dried them . I stuck three layers together using plenty of dimensional glue and then pressed the centre into a foam pad with the end of a paintbrush to create some dimension. When the glue was dry I added some flat backed pearls to the centers of the flowers ( I coloured the pearls with alcohol pens to tone with the design) .


The background paper is from the Craft Consortium paper pad and then the various elements that I created and some lace were layered on the card as shown . The main image was attached using foam pads to lift it over the lace  .


I hope I have inspired you to consider using fabric in your designs by showing you these different ideas . 
I have used the following Creative Expressions items to make this card :--- 
Stamps to die for --- Lily Corner.
Craft Dies by Sue Wilson --- Configurations,Meridian Edger ; Finishing Touches , Perfect Peony Complete Petals.
Embossing Folder by Sue Wilson--- Climbing Vines .
Cosmic Shimmer--- Lustre Fabric Paint , various colours .
Gilding wax --- Grey Blue .
Finishing Touches--- Satin Ribbon .
Craft Consortium--- English Garden Premium Collection.

If you would like to see what other members of the design team have been doing please look here 


Saturday, 18 June 2016

PaperArtsy Blog

Fabric Wallhanging

Hi there , today I am going to share with you a Wallhanging that I made using PaperArtsy stamps , paints and their new infusions . The entire piece is made of different pieces of fabric and lace sewn onto a large piece of backing fabric . All the decorated fabric was created using various stamps and mediums before being attached to the backing fabric .


I feel that although the Wallhanging looks finished it needs a little something extra ! However I haven't decided quite what it needs . Perhaps a fabric flower . When I have added any final touches I will put some more pictures on this blog to show you . In the meantime, if you want to find out more about  how I created the decorated fabrics and wallhanging please go to the PaperArtsy website -----PaperArtsy.co.uk

Tuesday, 14 June 2016

Creative Expressions Tuesday

MDF Floral Wallhanging

Today I am going to share with you a Wallhanging made from the Creative Expressions By the Sea Driftwood set . Now I know that this is called a driftwood set which of course suggests something to do with the sea but of course being me I went of in a completely different direction !

To start with I assembled the pieces of the set , and I arranged the pieces so that the eventual arrangement was not symmetrical. I painted the whole piece with white gesso . When that was dry I tore pieces of toning papers from the English Garden pad and attached them to the MDF to create a background.

I painted a coat of matte medium over the papers and gesso to seal everything. I then added some stamping to the background using Wateringcan ink . I used the script stamp ( from Textures) and the Floral Flourishes and stamped without a mount so that I could add small areas of the stamps in a random fashion to the piece .


Stamping like this pulls the whole background together instead of it looking like lots of separate bits of paper !


I stamped the lilacs , hydrangeas and peonies using Wateringcan ink because this is less dramatic than using black ink but dark enough to show up . I've painted the lilacs and hydrangeas using the same colours so that they go together but by doing this I have several different shapes to use . I kept the peonies fairly pale to tone in with the pinks found in the paper pad I used .


I cut the trellis using a spell binders die ( there is a similar one on the website which would work just as well but I didn't have that one ) out of black card . I then rubbed Gold Metallic Gilding Polish over the trellis. I felt that the gold was a little to bright so I added some Golden Green Giling Wax to tone it down .
I decided where I wanted to place the flowers on the MDF and then stuck the trellis onto it using foam pads where they would be covered by the flowers. I wanted the trellis raised a little from the background to create dimension. I added some lace and then attached the flowers using dimensional glue . 
The butterflies are from the hydrangea stamp set and I coloured them with the colours from my palette and then washed some pearl mica over them 


The quotes are from the Dream stamp set and were stamped and then triple embossed with clear embossing powder before mounting on black card .


I haven't decided yet how I will hang this on the wall but I think that I may add some chain to the top of the piece .

Creative Expressions items that I used include : ---
Creative Expressions MDF By the Sea Driftwood set .
Craft Consortium English Garden Premium Collection.
Stamps , Just Rite , Floral Flourishes background stamp , Peonies, Lilac Blossoms and Hydrangea Vintage Labels 7 .
Creative Expressions Stamps , Textures and Dream . 
Metallic Gilding Polish, Gold .

If you would like to see what other members of the DT have been doing please look here 


Tuesday, 7 June 2016

Creative Expressions Tuesday

Three Bookmarks .

I don't know if you know that you can get a set of six greyboard bookmarks from Creative Expressions. I thought I would have a go at decorating one -- in fact I ended up making three and it was fun . Because they are quite small I found that I could play with designs and have something finished very fast . I also wanted to find out what I could do with the new Intense Ink Stains .


I decided to mix the stains with gesso and see what happened. I used Emerald and Deep Plum and for the third colour I mixed them together to get a soft blue . It only needs a tiny amount of the stain to colour the gesso and I found that the colours dry slightly darker than the wet colour.
Next I wanted to stencil onto the base coat and I used white gesso . However I found that the stains came through the gesso. I found that if I painted over the base coat with matte medium it sealed the first layer and prevented this .


I decorated both sides of the bookmarks in the same way. Next I added some background stamping , as follows :-- 
Plum , Tulip Damask stamp , Watering Can ink .
Emerald, Textures stamp , script Wateringcan ink and crackle with Mushroom ink .
Blue , Textures stamp , script Wateringcan ink and Damask stamp Plum ink .
I used the stamps without a mount so that I could just add small areas of the patterns.


The final layer of stamping created the main decoration and was done with black ink as follows:--- 
Plum, Peonies, with a little added water colour painting to enhance the flowers .
Emerald, Vintage Flight .
Blue , now here I must apologise because I used a Creative Expressions stamp that I didn't realise is no longer available. Perhaps I could suggest some similar stamp sets from Creative Expressions namely Vintage Sewing, Vintage Games or Vintage


The pictures show both sides of the bookmarks.once everything was dry I added tassels made from embroidery threads in toning colours.
As I said these make lovely projects because they can be finished quickly and dare I suggest, might make nice little presents .

Creative Expressions items used : --- 
Cosmic Shimmer --White Gesso .
Cosmic Shimmer--- Intense Ink Stains, Deep Plum and Emerald.
Creative Expressions mini stencils -- Splash and Shabby Harlequin.
Creative Expressions Stamps -- Textures , Vintage Flight .
Just Rite Clear Stamps -- Peonies.
Creative Expressions-- Greyboard Bookmarks.

If you want to see what other members of the DT have been doing please look here