Tuesday, 27 September 2016

Creative Expressions Tuesday


Ornate Frames .

Creative Expressions have a set of two MDF ornate frames which I have decorated for this post .


I decided to keep the colours limited and use metallic colours to add to the project.
Creative Expressions items that I used for this project:--
MDF Ornate Oval Frames.
Creative Expressions Stamps by John Lockwood, Christmas Rose Elements ,
Just Rite Background Stamps , Blooming Vines and Floral Flourishes .
Spell binders die , Botanical Swirls.
Cosmic Shimmer Metallic Gilding Polish , Chocolate Bronze, Gold Treasure and pearl Lustre .
Cosmic Shimmer embossing powders , Copper and Gold
Creative Expressions gesso , white and black .
Creative Expressions Finishing Touches , Pearl Stick Pins .

You will also need some dried poppy seed heads little glass bottles and pearls .

 Paint the frame and back of the insert with black gesso . Paint the front of the insert with white gesso. I prefer to paint two thin coats and sand the surface between coats to create a smooth surface for stamping onto . Stamp the Blooming Vines onto the insert with Wateringcan Ranger Archival ink .


Using black card die cut the swirls . Rub all three of the gilding polishes over the die cut colouring it randomly . Cut the swirls to fit the insert . I find it easier to cut slightly larger , stick the card down
and then trim to fit .


Once this is attached the frame can be adhered to the insert .


Next stamp and emboss  the Christmas Roses onto white card with copper powder and cut them out . Notice that I used the corner stamp with three flowers on it and cut off the holly leaves leaving a pretty set of flowers . These can then be curled and stuck onto each other to make dimensional flowers .


Stick pearls to the poppyseed head and then paint them black . Once dry they can be rubbed with the metallic polishes .
Put the tiny bottles on the end of a paintbrush and paint them black . Heat set with a heat gun . It may require two coats . To stamp and emboss on the bottles , use Perfect Medium on the Floral Flourishes stamp and roll the bottle over the stamp . Then pour gold embossing powder onto the bottle and heat as usual.

Finally attach the bottles to the frame , put the seed heads into the bottles and attach them to the frame to keep them stable . Attach the flowers in place and add some pearl stick pins .

Here is the final piece . I like using poppyseed heads because of their architectural shape and once dry they are very tough !

These frames would be lovely for all sorts of projects , so let your imagination lead you .

If you would like to see what other members of the Creative Expressions DT are doing please go to 


Saturday, 24 September 2016

PaperArtsy


Bewitching Autumn .


Today I want to share this project which is inspired by the colours of Autumn. I coloured the background with PaperArtsy paints spread over the plaque with a credit card .


 I then stencilled these leaves using a PaperArtsy stencil and added some stamped grasses using paint .


This centre piece is painted corrugated cardboard . I then added crackle glaze and painted over it with    a paler paint . The leaves and words were stamped onto the card and then washes of colour applied to the card . The glimmer is from Treasure Gold .


I stamped leaves onto coloured papers and flowers onto yellow paper and cut them all out so that they could be added to the plaque. The artificial berries were painted to tone with the colour palette and also adhered to the plaque.


Finally the quote was printed onto canvas photocopy paper and coloured with washes of colour before mounting it on black card .


Here are two close ups of the plaque .


All the stamps used are from PaperArtsy, ELB29 and ELB30 . Also EEB08 .


This project is on the PaperArtsy blog where there is more detailed directions . If you would like to see it or see what other members of the PaperArtsy DT have been doing please go to 


Tuesday, 20 September 2016

Creative Expressions Tuesday


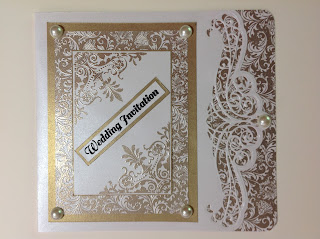
Some Inspirations for Wedding Stationery.

I have been making Save the Date cards recently for my daughters upcoming wedding . Of course I will soon be making the invitations and any other necessary stationary  ! This is  a lovely thing to do for any Wedding because the invitations will be completely individual  and personal.
So I thought I would give you an idea and hope to inspire you to make something different for a special event .
To create these cards I used the following items from Creative Expressions :-
Creative Expressions dies by Sue Wilson , Gemini Dies , Pavo.
Creative Expressions Stamps , Singles , Wedding Collection .
Just Rite Stamps ,Floral Flourishes Background Stamp and Ornate Corners .
Foundation Pearl Card. , Antique Gold and Icicle .
Embossing Powders , Gold and Black .

I started by die cutting the White card . This die is slightly narrower than the width of A4 card so the card will have to be trimmed .


Next I stamped and embossed with gold powder onto more white card  . I repeated the pattern to cover enough card to go under the die cut  .  This was adhered under the die cut piece and trimmed to size . I used a corner cutter to round the edges .


I stamped and embossed a second , smaller piece of card and trimmed it to size before mounting onto gold card .


I then stamped and embossed corners from the Ornate Corners stamp set and again mounted this onto gold card .


Finally I stamped and embossed in black the words and mounted this onto black card to make it stand out . All these pieces were attached to the card as shown and some flat backed pearls were added . Once finished an insert with any relevant information can be made and added to the card .


Here I have made a Save the date card in a similar way . The card is narrower and shorter than the main invitation . The die cut piece has been trimmed to fit but still looks lovely and this ensures that the different cards wil all match with each other 
Clearl the base of the card is the same as the main card . However I have used slightly different colours to make this card to show a variation that is possible 


I have used gold card to stamp on and black embossing powder . As the Save the Date card is smaller I have kept it simpler in this variation . 


Other variations could involve using gold card under the die cut white card and not stamping on it . Or why not use completely different colours ?
Anyway that's all for now , I'll be back soon . I hope this has given you some ideas .
If you want to see what other members of the Creative Expressions DT are doing please go to 

Creative Expressions Tuesday


Painted Bag


Today I am going to show you how I decorated a plain canvas bag using Creative Expressions Lustre Fabric Paints . These are lovely thick paints which dry with a great sparkle but I found that even when diluted with water they still sparkle . I also found that they dry a little paler than when wet .
I decorated both sides of the bag and put a piece of card with cling film covering it inside the bag to protect the side that was not being worked on .


Dampen the fabric with water . Each colour was thinned with water before applying randomly to the bag . I started with Antique Copper .


I then continued adding colours randomly . I used Royal Purple, Sea Green and Golden Lime . As the colours are applied they can be blended together where they meet . Dry thoroughly.


I then applied paint through stencils . These were all That Special Touch 6 X 6 masks --- Small Polka Dot , Peacock Mask and All Stirred Up .
I started with the polka dots and a mix of Atlantic Blue and Graphit Noir , creating dots randomly on 
the bag . Next I mixed Golden Lime , Sea Green and Atlantic Blue to make a brighter blue/green and 
stencilled the peacock feathers onto the bag extending the design up the bag .


Finally, using Pearl Lustre I added the swirls from all stirred up .


I then used stamps from the Creative Expressions Clear stamp sets -  Summer Meadow for the vine effect and the flowers from Wild Flowers . I used Graphite Noir paint to stamp with ( apply with cut and dry foam and wash the stamp as soon as you have finished ) . These paints stamp well and the image is clear , I created a vine- like effect by repeat stamping as shown .


Using the flower I added to the vines . The stem of the stamp can be bent gently in different directions to creat variety.  Leave some spaces for the butterflies!


Here you can see how I have coloured the handles and extended the stencilling onto the handles .


Finally stamp butterflies from the Butterfly Splash set . This shows the finished bag from one side and the next picture shows the other side 


Here is part of the bag with a tag made to match tied on with twine .


The tag is made from greyboard cut to size and painted with white gesso. I then decorated some fabric in the same way as the bag and adhered it to the tag . The flower is made from more painted fabric rolled and twisted. Add other decoration as needed to finish the tag .

As you can see these paints are lovely and can be used in different ways . Combined with the amazing silhouette stamps the results are clear . I hope this will give you some inspiration  about decorating fabric .

Items from Creative Expressions used to decorate this bag include :--
Lustre Fabric Paints ---  French Pearl, Graphite Noir ! Atlantic Blue , Golden Lime , Royal Purple , Antique Copper and Sea Green .
Creative Expressions Clear Stamp Sets --- Wildflowers , Summer Meadow and Butterfly Splash.
That Special Touch Masks --- Small Polka Dots , Peacock Mask and All Stirred Up.

If you want to see what other members of the DT team are doing please go to