Tuesday, 23 February 2016

Creative Expressions Tuesday

Hi there , well I'm back again for my regular CE blog post .
Today I have made a simple monotone card ..


I created layers of card before adding some stamping as the main feature. The card is an 8 X 8 inch black card . The first layer was created by cutting a square of card and embossing it . The frilly edges are die cut and stuck under the edges of the embossed square. I rubbed Frosty Mink Colour Cloud Blending Ink all over the square and then Decadent Oak around the edges . Finally I rubbed Frosty Mink gilding wax around the edges .
The die cut frame is made from two die cut frames which were trimmed and then stuck together. I added Decadent Oak ink around the edges followed by the gilding wax . This was mounted on black card trimmed close to the edges of the frame .and then mounted on cream card which had had blending ink rubbed around the edges . I mounted this on more black card .
I used Alexandra's Tea Rose Corner to stamp the design . Although this is a corner , I used it at an angle . I stamped and embossed with gold embossing powder and rubbed ink around the edges of the card before attaching it to the frame . ( the card I stamped on covered the fact that the frame was made from two pieces ) .


To complete the card I wrapped some ribbon around the base layer and stuck it onto the card . The stamped ,framed piece was mounted onto the card using foam pads . I added a bow from the ribbon along with some flowers and pearls.
The word ' imagine ' was stamped onto a piece of card and mounted onto a piece of card , cut with a die from the same set as the frame . I mounted this on black card .

I have used the following Creative Expressions items to make this card : --- 
Stamps to Die For , Alexandra's Tea Rose Corner.
Craft Dies by Sue Wilson , Refined Rectangular Frame and Diagonals - Labyrinth.
Colour Cloud Blending Ink , Frosty Mink and Decadent Oak .
Creative Expressions Silky Crush Ribbon , Champagne.
Flat backed Pearls .
The word 'imagine ' is from one of my Creative Expressions stamp sets .

If you would like to see what other members of the C E Design team have been doing please click here creativeexpressionscraft.blogspot.co.uk

Saturday, 20 February 2016

My New Stamp Designs released by PaperArtsy

Hi there , after all the excitement about my new stamps yesterday I thought I would show you another project using the stamps . This time I have used them to create something which resembles  a painted art work . I have painted for many years and rather enjoyed playing with the stamps in this way !
I have adapted a very old painting technique to colour the stamped images . It is called Grisaille . Using neutral or grey shades the form of the image is created , sometimes the design is left just in shades of grey . However it is possible to add colour over the top of the grey so that the grey acts as shading under the colour l
I have painted on an MDF platter that I had , firstly with a coat of gesso . Sand the surfac after the gesso is dry ( When working on MDF don't sand until it has a coat of paint on it .)  The blue colour is PaperArtsy paint Lake Wanaka and the yellow is Vanilla mixed with a touch of Caramel .
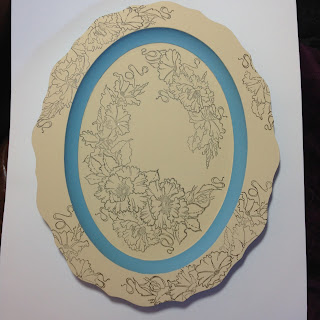
Once the paint is dry the images can be stamped. I used StazOn Timber Brown because I felt that it created a softer outline than a black ink .

I have used the floral stamps from both new sets to create the design. I stamped the central image and then masked it out as shown before stamping other images around the platter . This shows the centre of the platter and I then stamped the edges in the same way.


After stamping the design I painted the petals using Chalk White to create the highlights. I left the leaves yellow .


This is where the shading is added . I mixed French Roast with a little Lake Wanaka to create a soft grey and mixed it with Matt Glaze to make it transparent and washed this colour into any areas that should be shaded or darker. Don't worry about getting some of the glaze on the white because this helps blend the colours together.


To add the coloured glazes I mixed the colours with Matt Glaze and washed them onto the flowers . I used Pumpkin Soup mixed with Autumn Fire, then Autumn Fire and finally Claret . The colours are 
deeper towards the centres of the flowers.


The other flowers were coloured in the same way using Beach Hut then Glass Blue and lastly Eggplant.


The leaves were painted the same way using Hey Pesto . To 'pull' the two sets of colours together I added glazes of Eggplant to the pink flowers and Pumpkin Soup to the blue flowers . I also added washes of Glass Blue and Autumn Fire to the background around the flowers . By adding these colours across the painting the picture comes together instead of looking like separate pictures on the 
platter.. To finish the piece I rubbed While Fire Treasure Gold around the edges .


Here is the finished platter .
I enjoyed painting this because it combined my two loves of stamping and painting .l hope this 
method of colouring has inspired you to try it out .

For more information about PaperArtsy stamps and paints please go to 
PaperArtsy.co.uk PaperArtsy.co.uk


Friday, 19 February 2016

PaperArtsy New Stamp Release

Hi there , today I am very excited because those nice people at PaperArtsy are releasing two new sets of stamps . And the reason that I am so excited is because they are my designs . It is very strange because having spent time designing these stamps , when I work with them they don't feel like my designs anymore ! When I create designs with them I work with them in the same way that I would work with any stamps and I look for ways of combining them and using colour with them that will look good .
So with that in mind I am going to show you the projects that I made for the stamp release. The first three projects are also on the PaperArtsy website with information about how to make them , so I will just show you the pictures .

Now I have three more samples to show you with a few step by step photos and a little information . To make all these projects a limited palette of colours was used , so I will list the colours here to avoid repeating them constantly: - Wintergreen , Vanilla ,Blush , Very Berry and Plum .
Firstly ----- 

For this project I used stamp set EEB 07 . I wanted to put the flowers on a trellis , but unfortunately I
didn't have a large trellis die so I used a little imagination a cut several smaller pieces and fitted them 
together . I painted the card that made the background with wintergreen before attaching the trellis to it .


I stamped and coloured the flowers and then cut them out and attached them to the trellis as shown .
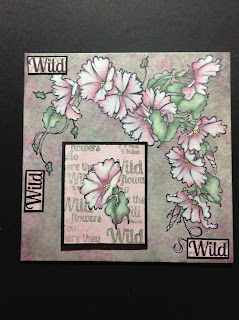
The flowers at the top of the arch have been cut from the large curved stamp . I stamped and cut out the quote and raised it on foam pads when sticking it to the arch .

The next project ----- 


I pressed Grunge Paste through a stencil , allowed it to dry and then painted the background with 
wintergreen. When that was dry I rubbed White Fire Treasure Gold onto the raised areas .


I stamped the flowers from EEB08 several times so that I would be able to layer the flowers on the project and painted them . I also painted a die cut trellis heart and rubbed Treasure Gold around the edges . I also rubbed some Royal Amethyst Treasure Gold around the edges of the background .


I then cut out the flowers so that I could attach them to the project in layers using dimensional glue . Everything was attached to the base as shown .

And Finally ----  

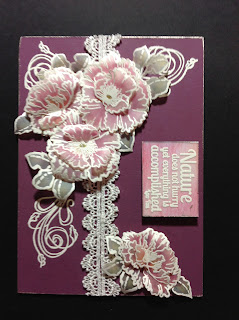
Firstly I stencilled ferns  ( from PaperArtsy Stencil 006 ) across the background which was painted with Nougat paint I then stamped and embossed with gold powder some flourishes over the ferns .   . I then stamped the flowers several times because I intended to layer them up . I painted and cur out the flowers and then attached them using dimensional glue  . 


I stamped and embossed the quote onto a piece of card painted with Nougat paint . This was mounted on layers of toning card before attaching it to the base .

I hope that you have enjoyed looking at the various projects . If you want to see more about these stamps please click here --- PaperArtsy.co.uk


Tuesday, 16 February 2016

Creative Expressions Tuesday

Fantasy Boudoir.


Good Morning to you all ! I'm here again with my regular blog for Creative Expressions. Today I have gone a little crazy and I have made a small niche out of grey board . I decorated the top and base of the niche with die cut pieces of card and attached part of a curtain tieback holder to make the stand ( this had the advantage of creating a good stand for the niche and being solid enough to make the whole piece stable) . After the glue was dry I painted everything with Cosmic Shimmer black Gesso .


I then stamped and embossed with gold embossing powder several lines of the flourish from the stamp set onto black tissue paper. This was then attached to the niche along the sides and around the base using Matt medium . I rubbed some Graceful Mint gilding wax along the edges of the niche .


To create the background inside the niche i used some card and embossed it using a large embossing folder --- Large Heart Lattice . I painted this with more black gesso. When this was dry I rubbed the Graceful Mint wax over the whole card and then I rubbed Cast Bronze wax just onto the raised embossed pattern. I then stuck the card into the back of the niche. I rubbed more of both the waxes onto the decorative top and bottom of the niche .


Onto the fun bits , I stamped and embossed using black embossing powder, the two bodices as 
shown. . l used Cosmic Shimmer Watercolour Paints to add colour to the images .


I then altered some embellishments to allow them to tone in with the colour scheme:

1 . The bottles . Roll the bottle in versemark ink and shake gold embossing powder over this . I find it 
helpful to hold the bottle with the end of a paintbrush in the bottle while doing this . It may be 
necessary to emboss twice to get good coverage. The cork bunts were rubbed with the gilding waxes .
2 . The Flowers . I rubbed the Cast Bronze wax over the resin flowers and sprinkled gold embossing 
powder on them before heating .
3 . The keys . I just rubbed the two waxes over the little keys .

I added some lace diagonally across the back of the box before sticking all the pieces in place as shown . The pearls were coloured with toning alcohol inks .


.

Well that's all for now folks , I hope you enjoyed today's blog , see you next week .

Items used in this project includes:- 

Creative Expressions Stamp Set --- Vintage Lingerie.
Large Embossing Folder--- Large Heart Lattice.
Cosmic Shimmer Watercolour Paints .
Metallic Gilding Waxes -- Gracful Mint and Cast Bronze.
Creative Expressions bottles , resin flowers , tiny keys and flat back pearls .

If you would like to see what the other DT members have been up to please click here 


Tuesday, 9 February 2016

Creative Expressions Tuesday

Creative Expressions Tuesday Post .

Pretty Heart

 Hi there , here I am for my regular Tuesday post . This week has found me lying on the sofa , moaning , suffering from some nasty bug , so sadly I have not been able to post anything else . I hope to do a bit of catching up over the next few days!
I decided to create a pretty heart , very romantic and feminine, in view of the upcoming date !
I started by cutting a large heart out of heavy cardboard , which l painted on both sides with Cosmic Shimmer White Gesso . Once this was dry I attached decoupage paper to both sides .
Using a Just Rite die I cut out seven fan shapes . I thought it would be easier to stamp the design first and then cut the shapes out , but in fact it was easier to cut then stamp . I then stamped and embossed the design onto the die cut pieces, using Cosmic Shimmer Gold embossing powder. ( Just Rite Vintage Fan Die and Just Rite Vintage Fan and Sentiments Stamp set ) .


I used Cosmic Shimmer Color Cloud ink , Pretty in Pink, to lightly clour around the edges of each piece . I then used some of the flourish stamps from the same set to stamp around the edges of the heart , embossing in gold again .


I stuck lace across the heart , the White lace is Guipure lace and there are similar laces on the Creative Expressions website .


To complete the heart I attached the fan pieces to the heart as shown . I used a dimensional glue to create some height and also to be able to attach the pieces over the lace. I wanted some flowers to 
tone in with the colour scheme . I found some hessian flowers in my stash , but of course the colour was wrong . So I painted them with Irridescent mica powder mixed with Matt medium .  I added 
these to the heart along with some small paper flowers and finally added flat backed pearls to the fan .

I admit that this is very romantic but I am unrepentant! It is , after all almost 14th February. Back next week .
Here is a list of Creative Expressions items used : 
Just Rite Vintage Fan Dies .
Just Rite Vintage Fan and Sentiments Stamp Set .
Color Cloud Blending Ink - Pretty in Pink.
Cosmic Shimmer White Gesso.
Cosmic Shimmer Gold Detail Embossing powder.
Cosmic Shimmer Irridescent Mica powder .
Craft Consortium Decoupage Paper-- Antique Rose .
Guipure lace and flat backed Pearls.

If you would like to see what other members of the Creative Expressions DT team are doing please click here creative expressions craft.blogspot.co.ukcreativeexpressionscraft .blogspot.co.uk

Tuesday, 2 February 2016

Simply Violet


Hello again , I'm back with another Creative Expressions post . Today's card is called Simply Violet because I feel it is a simple card and I have used John Lockwood 's set of Violet stamps .
What do you do if you want a Violet background and don't have a Violet Colour Cloud ink ? Well I used Ocean Blue and Decadent Grape ! I used a piece of coconut card and blended both the inks over the card . I found that I needed to add plenty of ink to get it to blend well but the end result was a lovely colour . 

I then cut out three pieces of card to create the panels on the card . The top panel was stamped from the Violet Elements stamp set . The quote was embossed with Cosmic Shimmer silver embossing powder  . The long back panel was stamped from the same stamp set as shown . The violets on both panels were painted with Cosmic Shimmer Irridescent Mica Pigments .
The middle panel is more pastel because I blended Cosmic Shimmer White Gesso over the dry ink . By doing this the colours tone together but are more interesting than just using the same depth of colour for each panel .


The front panel was mounted onto coconut white card and then all the panels were mounted on black card . The panels were mounted on the card as shown . I added Guipure lace ( find similar on the Creative Expressions website ) and a vintage black button  . The purple pearls are actually cream pearls coloured with alcohol pen ink .
So that how I made this card which would be a nice quick make if you need a card fast ! See you next week , bye for now .

Creative Expressions items used include Violet Elements Stamp Set designed by John Lockwood .
Colour Cloud Blending Inks , Ocean Blue and Decadent Grape .
Cosmic Shimmer Irridescent Mica Pigments and White Gesso .
Various embellishments including pearls , vintage black button and Guipure lace .
Coconut white and black card .

If you would like to see what the other DT members are up to please click here -
creativeexpressionscraft.blogspot.co.uk